The World: Difference between revisions
No edit summary |
No edit summary |
||
| Line 3: | Line 3: | ||
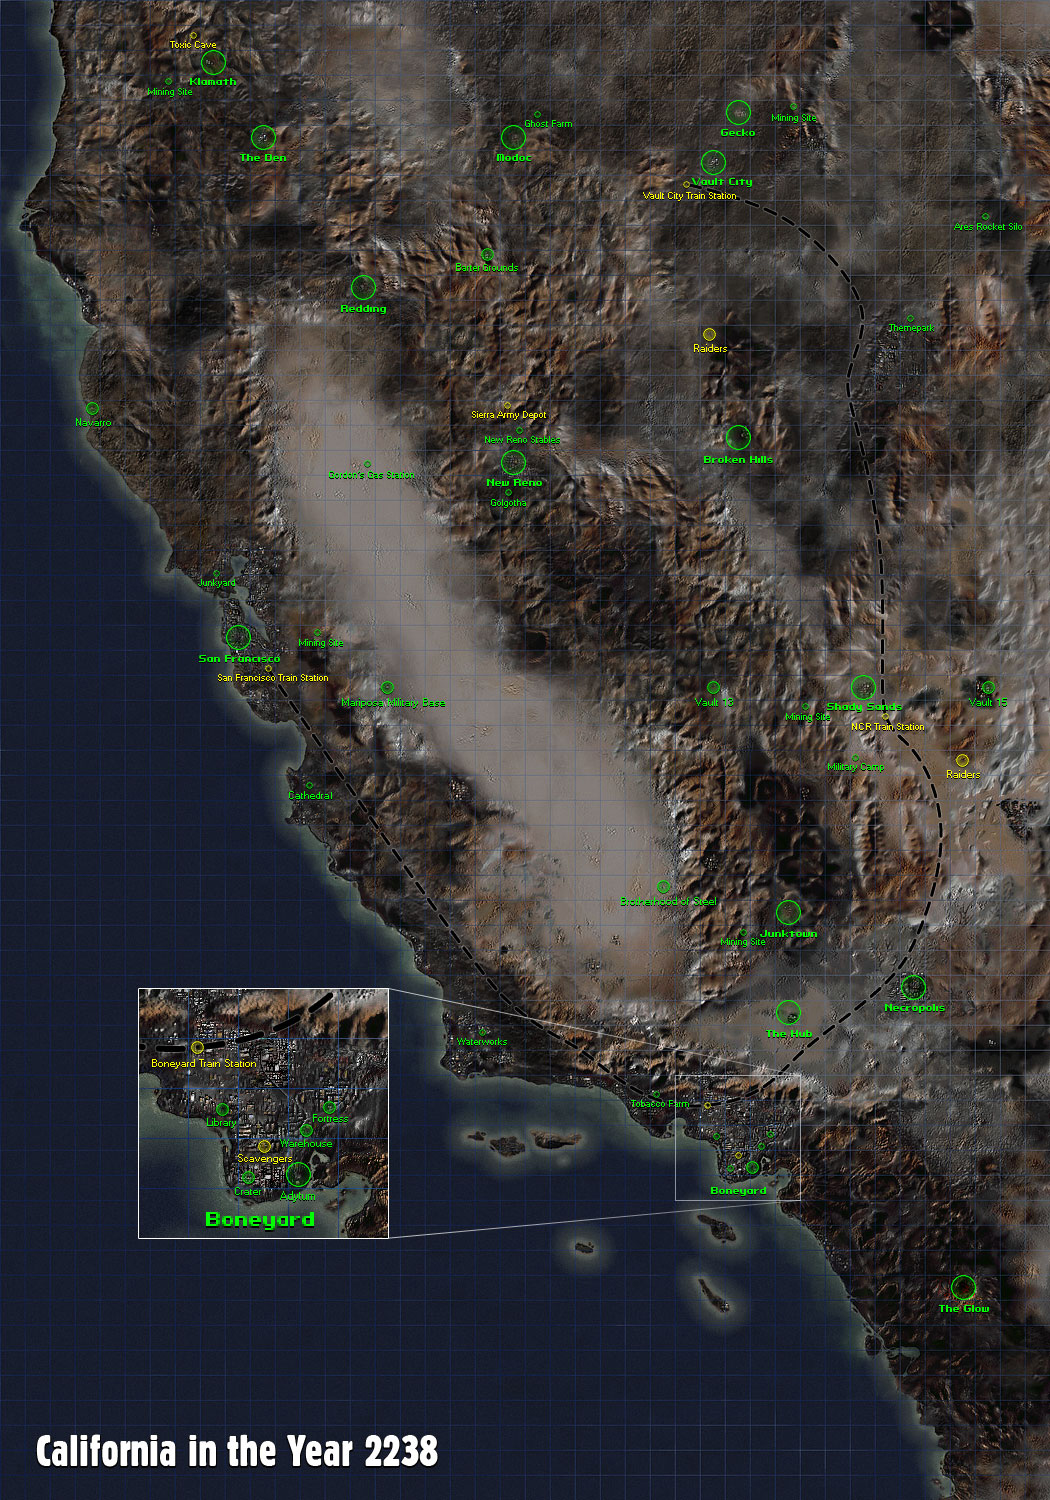
The map is split into [[Zones]], which appear as square areas created by horizontal and vertical lines. Each zone has an address, like '''12:2''' or '''17:25'''. Referring to a zone by its address is a clear way to communicate to friends where you are. There are also more specific coordinates that can be used when referring to a [[Zones|Zone]] is not specific enough. Mouse over the map to see both [[Zones|Zone]] addresses, and coordinates of very specific spots on the map. | The map is split into [[Zones]], which appear as square areas created by horizontal and vertical lines. Each zone has an address, like '''12:2''' or '''17:25'''. Referring to a zone by its address is a clear way to communicate to friends where you are. There are also more specific coordinates that can be used when referring to a [[Zones|Zone]] is not specific enough. Mouse over the map to see both [[Zones|Zone]] addresses, and coordinates of very specific spots on the map. | ||
Click a location below to go to that location's specific page to read more information about it. This world is a dangerous place, and traveling in it can lead to many hostile [[Group Encounters|encounters]]. Thus any character is at risk while traveling on the map. You are however safe while staying still on the map. | Click a location below to go to that location's specific page to read more information about it. This world is a dangerous place, and traveling in it can lead to many hostile [[Group Encounters|encounters]]. Thus any character is at risk while traveling on the map. You are however safe while staying still on the map. | ||
'''NOTE''': Some public locations are not shown here. (This is an old map image.) Have fun finding these: | |||
* [[Prison]] | |||
* [[Talchem California HQ]] | |||
* [[Woodland Fields]] | |||
* [[West Side Freeway]] | |||
* [[Breakwater Farms]] | |||
* [[Gecko Sanctuary]] | |||
* [[Badega Bay]] | |||
* [[The Winston Family Mansion]] | |||
* [[Dead Horse Bay]] | |||
* [[Abandoned Homestead]] | |||
'''NOTE''': Some of these locations (mainly the larger cities / towns) can be [[preview]]ed. | '''NOTE''': Some of these locations (mainly the larger cities / towns) can be [[preview]]ed. | ||
Revision as of 22:27, 31 December 2017
Below is our beloved "World Map". In-game, it shows all public locations characters can visit, but each character's world map will also show their Tent locations, Safe Houses and Bases. You will also see more temporary locations on the map, like quest locations, where Vehicles might be parked, where someone sent a Radio distress signal, or where some people set up a Flare Trap.
The map is split into Zones, which appear as square areas created by horizontal and vertical lines. Each zone has an address, like 12:2 or 17:25. Referring to a zone by its address is a clear way to communicate to friends where you are. There are also more specific coordinates that can be used when referring to a Zone is not specific enough. Mouse over the map to see both Zone addresses, and coordinates of very specific spots on the map.
Click a location below to go to that location's specific page to read more information about it. This world is a dangerous place, and traveling in it can lead to many hostile encounters. Thus any character is at risk while traveling on the map. You are however safe while staying still on the map.
NOTE: Some public locations are not shown here. (This is an old map image.) Have fun finding these:
- Prison
- Talchem California HQ
- Woodland Fields
- West Side Freeway
- Breakwater Farms
- Gecko Sanctuary
- Badega Bay
- The Winston Family Mansion
- Dead Horse Bay
- Abandoned Homestead
NOTE: Some of these locations (mainly the larger cities / towns) can be previewed.
NOTE: Whenever traveling on the map, you can click the Home button on your keyboard to center it on your character.
For an alphabetical list of all the locations, go to the Locations category page.